In this time, we will create a bullet hell aka barrage for a barrage shooting game. The bullet hell is a large number of bullets (or similar long-range attacks) like a curtain. A “bullet hell shooter” is a game in which the player shoots at and defeats enemy characters while dodging and weaving through the gaps between the bullets. Some games specialize in simply dodging the bullets. Many games are based on the motif of spaceships and fighter planes that fit the image (in this tutorial, a ground battle between a wizard and a monster though).
In this tutorial, we will focus only on creating a bullet hell. Also, while bullet hell come in various shapes and sizes, we will focus on rotating-type bullet hell.
Environment
This tutorial was created in the following environment
・Godot version: 3.4.2
・Computer OS version: macOS 11.6.5
The project file for this tutorial is located at GitHub repository . After downloading the .zip file, import the “project.godot” file in the “Start” folder into the Godot Engine, and you will be able to start with a project that has only been prepped. If you would like to see the completed project in a hurry, import the “project.godot” file from the “End” folder.
All the assets imported into the project were downloaded from KENNEY website. I used an asset pack called 1-Bit Pack . I can’t help but be thankful for this wonderful free material.
Now, when you open the project in the “Start” folder in Godot Engine, the following are already created.
1.Player character (wizard) 2.
2.Player character’s long-range attack (magic) 3.
3.Enemy character (the monster who releases a barrage of bullets) 4.
4.Game world (the game world in which the above objects exist)
First of all, please run the project in the “Start” folder, where only the preliminary work has been completed, to see how it works.
The game is set up as follows.
- The player character can control movement and magic long-range attacks with the keys below.
- move_up: W key - the player character moves up.
- move_down: S key — moves the player character down.
- move_right: D key - moves the player character right.
- move_left: A key - moves the player character left.
- magic: Spacebar or left mouse button - Casts a spell.
- The player character dies after 10 hits from enemy character bullets.
- If the player character dies, the game is over (debug panel closes automatically).
- The enemy character can only move for now.
- The enemy character will move toward the player character every 2 seconds.
- Enemy character dies after 5 magic hits.
- Magic is ineffective while Enemy characters are flashing red and white after a hit.
- When an enemy character dies, the next enemy character appears within a radius of 50px from the player character.
- The appearance of the enemy character changes randomly each time.
- The player character’s magic disappears 1 second after it is released.
- The game world can be moved unlimitedly.
Creating a bullet scene
To create a bullet hell scene, we need each of the bullets that make it up. Therefore, we will start by creating the bullet scene.
Creating a scene
Create a new scene of a bullet by following the steps below.
- Select “Scene” menu > “New Scene”.
- Select “Other Node” in “Generate Root Node”.
- Select a node of the “Area2D” class as a root node.
- Rename the root node “Area2D” to “Bullet”.
- Save the scene here once, setting the file path to “res://Enemy/Bullet.tscn”.
Adding nodes to the scene
Next, add child nodes to the root node “Bullet.
- add a node of the class “Sprite” to the root node “Bullet”. This is the appearance of a bullet.
- Add a node of the “CollisionShape2D” class to the root node “Bullet”. This is used to detect when the bullet collides with the physical body.
- Add a node of the “VisibilityNotifier2D” class to the root node “Bullet”. This is used to detect when a bullet goes off the screen.
Official Godot Docs:
VisibilityNotifier2D
The scene tree should now look like this.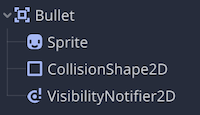
Editing the properties of the nodes
Continue to edit the properties of each node.
Bullet(Area2D)node
No editing of the properties of this root node is required.
Sprite node
In this case, we will use the method of setting the sprite texture by specifying the range of textures to be used from a single sprite sheet that contains a large number of textures.
- In the inspector, apply the resource file “res://colored-transparent_packed.png” to the “Texture” property of the “Sprite” node.

- Turn on “Region” > “Enabled”

- Open the “Texture Region” panel at the bottom of the editor and specify the region of the texture you want to use in the sprite sheet.

- First, expand the panel to the top of the editor for easy viewing, and then enlarge the sprite sheet to a size that is easy to see.
- Select “Grid Snap” in “Snap Mode” at the top of the “Texture Region” panel.

- Set the “Step” at the top of the panel to 16px 16px as well. This will make the grid the same size as the sprites on the sprite sheet.

- Select the texture you want to apply to the bullet on the sprite sheet. In this tutorial, we selected a skull texture. It is a horror that a monster will release a barrage of skull bullets.

- Return to the inspector and change the color to the bullet color of your choice in the Visibility > Modulate property. Here, as a sample, we have chosen the somewhat eerie purple color #9da4d8.

CollisionShape2D node
- In the inspector, apply the “New CircleShape2D” resource to the “Shape” property.

- In the 2D workspace, match the collision shape to the size of the “Sprite” node texture.

- If entering directly in the inspector, set the “Radius” property of the “CircleShape2D” resource to 8.

VisibilityNotifier2D node
No editing of the properties of this root node is required.
Controlling bullets with a script
Next, let’s program a script to control bullets. Let’s attach a new script to the root node “Bullet”. Create the file path as “res://Enemy/Bullet.gd”.
First, edit the script as follows.
### Bullet.gd ###
extends Node2D

# Seconds of a bullet
export var speed = 150

# Physical process method called 60 times/second
func _physics_process(delta):
	# Move the bullet every frame by adding the current bullet position to..
	# the current bullet direction x the current bullet direction x..
	# the speed of the bullet per second x 1 frame of time
	position += transform.x * speed * delta
Next, since the root node “Bullet” is an Area2D class, we will use its signal to make the bullet disappear when it hits the physical body. Select “Bullet” in the inspector and connect the signal “body_entered(body)” to this “Bullet.gd” script in the Node Dock > Signal tab.
Execute method queue_free in method _on_Bullet_body_entered generated by connecting signals.
### Bullet.gd ###
# Methods called by signals sent out when physical bodies collide
func _on_Bullet_body_entered(body):
	# free Bullet
	queue_free()
Similarly, use the signal of the “VisibilityNotifier2D” node to make the bullet disappear when it goes off the screen. Let’s connect the “VisibilityNotifier2D” signal “screen_exited()” to this “Bullet.gd” script.
Execute method queue_free in method _on_VisibilityNotifier2D_screen_exited generated by connecting the signal.
### Bullet.gd ###
# Method called by a signal that is sent out when Bullet go off-screen
func _on_VisibilityNotifier2D_screen_exited():
	# free Bullet
	queue_free()
This completes the Bullet scene. After this, the created bullet scene instance is added to the enemy character’s scene tree so that the enemy character can fire bullets.
Creating a bullet hell
Controlling the bullet hell with a script
From here, we will edit the script “Enemy.gd” attached to the root node “Enemy” in the “Enemy.tscn” scene of the enemy character to control the bullet hell. After opening “Enemy.gd” in the script editor, let’s first define the necessary properties. In the following code, please add the code where it is commented “# Add”.
### Enemy.gd ###
extends KinematicBody2D

signal died

# Add: reference to preloaded Bullet.tscn
const bullet_scn = preload("res://Enemy/Bullet.tscn")

var enemy_life = 5
var enemy_speed = 800
var delta_count = 0

# Add: Distance from the center of the Enemy to the firing position of the bullet
var radius = 20
# Add: Rotation speed of the bullet's firing position around the Enemy
export var rotate_speed = 40
# Add: Interval between firing bullets (seconds)
export var interval = 0.4
# Add: Number of bullets fired at one time
export var spawning_count = 4
It may be a little difficult to visualize from the comments in the code alone, so a diagram is attached.
As you can see, it is easy to imagine a circle with “Enemy” as its center and the value of the property radius as its radius. Of the bullets to be fired at a time specified by the property spawning_count, the first firing position should always be (x: radius, y: 0), and the second and subsequent bullets should be placed from there at equal intervals (angle difference) around the circumference of this circle. The bullets are shifted by the property rotate_speed in a clockwise direction every second specified by the property interval, and then fired.
Then edit the _ready method, which is called the first time the scene is loaded. In the _ready method, add the code for initialization necessary to generate the bullet hell. It should be easier to understand if you can visualize the above diagram.
### Enemy.gd ###
func _ready():
	anim_player.play("spawn")

	randomize()
	sprite.frame = randi() % sprite.hframes

	### Add all of the following ###
	# Define step as the interval (angle difference) between bullets fired at once
	# step is 180° x 2 = 360° divided by the value of the property Spawning_count
	var step = PI * 2 / spawning_count
	# Loop for the number of values in spawning_count
	# e.g) If spawning_count is 4, i will be filled with 0 ~ 3 in that order
	for i in spawning_count:
		# Create a new Node2D node to be used as a marker of the bullet's firing position...
		# and define it as spawn_point
		var spawn_point = Node2D.new()
		# Define the firing position as pos
		# Define pos as the position rotated by (step x i) from the base position (x: radius, y: 0)
		var pos = Vector2(radius, 0).rotated(step * i)
		# Place spawn_point at the bullet's firing position
		spawn_point.position = pos
		# Align the orientation of the spawn_point with..
		# the angle from the positive x-axis to the firing position
		spawn_point.rotation = pos.angle()
		# Make spawn_point a child of the Rotater node (Node2D)...
		# that has been prepared in advance as a node for rotation
		rotater.add_child(spawn_point)

	# Set the wait_time property of the Timer node with the value of the interval property
	timer.wait_time = interval
	# Wait until the animation of the AnimationPlayer node is finished
	yield(anim_player, "animation_finished")
	# Start the timer of the Timer node
	timer.start()
Now, every time the “Timer” node times out, place an instance of the “Bullet.tscn” scene you created earlier at the same position as the child node of the “Rotater” node (the spawn_point in the above code), and the bullets should fly automatically. Now let’s edit the _on_Timer_timeout method called by the “timeout” signal of the “Timer” node. Since the signal has already been connected in the preparation, replace pass in the method with the following content.
### Enemy.gd ###
# Methods called on the timeout signal of a Timer node
func _on_Timer_timeout():
	# Loop over the child nodes of the Rotater node
	for node2d in rotater.get_children():
		# Instance of Bullet.tscn
		var bullet = bullet_scn.instance()
		# make Bullet instance node a child of its parent node (World node) rather than Enemy node
		get_parent().add_child(bullet)
		# Make the Bullet instance position the same as the Rotater child node position
		bullet.position = node2d.global_position
		# set the direction of the Bullet instance to be the same as...
		# the direction of the child node of Rotater
		bullet.rotation = node2d.global_rotation
The firing position still does not rotate, but for the time being, it should now fire the specified number of bullets at the specified time difference. Let’s run the project.
Next, let’s rotate the firing position of the bullets a bit to make it more like a bullet hell. This time, we will update the code in the _physics_process method a little. Please add the comment “# Add” in the following code.
### Enemy.gd ###
func _physics_process(delta):
	delta_count += delta
	if delta_count > 2:
		delta_count = 0
		if get_parent().has_node("Player"):
			anim_player.stop()
			anim_player.play("move")
			var direction = global_position.direction_to(get_parent().get_node("Player").global_position)
			var velocity = direction * enemy_speed
			velocity = move_and_slide(velocity)

	# Add: define next direction (angle) as new_rotation
	# new_rotation is the current rotation of the Rotater node + rotate_speed x the time of 1 frame
	var new_rotation = rotater.rotation + rotate_speed * delta
	# Add: rotate the Rotater node by the remainder (angle) of new_rotation divided by 360
	rotater.rotate(fmod(new_rotation, 360))
Now the bullet’s firing position should rotate every 0.4 seconds as specified in the interval property. Let’s run the project again to see if it behaves as expected.
Customizing the bullet hell
Properties defined in scripts can be easily edited in the inspector if the export keyword is added at the beginning. Let’s change the values to create a different bullet hell than the previous one.
Sample 1
- Rotate Speed: 45
- Interval: 0.5
- Spawning Count: 10

Sample 2
- Rotate Speed: 10
- Interval: 0.1
- Spawning Count: 8

Sample 2 has turned out to be a very devilish game. But what a thrilling and enjoyable experience.
Adding randomness
At the preliminary stage, the appearance of the enemy character (sprite texture) is coded to be randomly determined from six different types. If the properties of the bullet hell are also randomly determined, it would be interesting because it is impossible to predict what kind of bullet hell will be unleashed each time. In fact, it is surprisingly easy to implement this script by just adding a few codes to the script described so far.
Now, open the “Enemy.gd” script in the Script Editor. First, define the upper and lower limits of each property to form the bullet hell that has already been prepared in a separate property. Let’s update the lines commented “# Add” and “# Change” in the following code.
### Enemy.gd ###
var radius = 20
export var rotate_speed: float # Change: only define type and leave value undefined
export var max_rotate_speed = 80 # Add
export var min_rotate_speed = 20 # Add
export var interval: float # Change: only define type and leave value undefined
export var max_interval = 0.8 # Add
export var min_interval = 0.2 # Add
export var spawning_count: int # Change: only define type and leave value undefined
export var max_spawning_count = 10 # Add
export var min_spawning_count = 2 # Add
Next, edit the _ready method, as we need to apply random values to each property at the time the scene is loaded. Let’s add the lines commented “# Add” in the code below.
func _ready():
	anim_player.play("spawn")

	# enable random value generation
	randomize()
	sprite.frame = randi() % sprite.hframes # int, max: 5

	# Add: assign a random fraction to rotate_speed with...
	# min_rotate_speed as the lower limit and max_rotate_speed as the upper limit
	rotate_speed = rand_range(min_rotate_speed, max_rotate_speed)
	# Add: Assign a random fraction to interval with...
	# min_interval as the lower limit and max_interval as the upper limit
	interval = rand_range(min_interval, max_interval)
	# Add: The upper limit is -1 from the specified value in the subsequent calculation...
	# so it is adjusted by +1 first.
	max_spawning_count += 1
	# Add: Assign a random integer to spawning_count with...
	# min_spawning_count as the lower limit and max_spawning_count as the upper limit
	spawning_count = randi() % max_spawning_count + min_spawning_count

	var step = PI * 2 / spawning_count
	for i in spawning_count:
		var spawn_point = Node2D.new()
		var pos = Vector2(radius, 0).rotated(step * i)
		spawn_point.position = pos
		spawn_point.rotation = pos.angle()
		rotater.add_child(spawn_point)

	timer.wait_time = interval
	yield(anim_player, "animation_finished")
	timer.start()
A few additional notes on the generation of random values.
First, rand_range returns a random float number with the first argument as the lower limit and the second argument as the upper limit. It is used for the properties rotate_speed and interval because these properties are defined as float types.
Next, randi is a method that returns a random integer, but since it takes no arguments, it is not possible to specify an upper or lower limit.
Therefore, we use the fact that the remainder when the returned value is divided by the upper limit is 0 or more and less than (upper limit -1). Since the maximum value is the specified upper limit -1, put a code max_spawning_count += 1 one line earlier to add +1.
The symbol % (modulo) can be used to obtain the remainder obtained by dividing a by b using a % b. If we add c to that value as a % b + c, the result cannot be smaller than c. In other words, a random integer with upper and lower bounds can be expressed as randi() % upper bound + lower bound. Remember that the maximum value returned is the upper limit -1.
In this case, the randomize method was written first, but without it, the result will be the same every time, so if you use methods that return a random value, it is good to remember to write it at the beginning of the _ready method.
Finally, let’s run the project to see if each monster that appears will have a different bullet hell.
Conclusion
In this tutorial, we created a bullet hell for a top-down shooter. For a rotating bullet hell like this one, the following points will be important.
- Set the radius of the circle, the rotation speed of the firing position, the time difference of firing, and the number of simultaneously fired bullets with properties
- Prepare a node for rotation.
- Calculate the firing position based on the radius of the circle and the number of rounds fired simultaneously.
- Add child nodes to the Rotater node to mark the firing position.
- Set the timer time to the time difference of the firing.
- In the physics process, always rotate the Rotater node according to the rotation speed
- When the timer times out, an instance of the bullet is created at the location of the marker node.
There might be better ways to implement this, and I hope that you will experiment with various methods and finally adopt the best one.
In addition, actual bullet shooters are not only rotating types like this one, but are also diverse, such as wave-shaped, fan-shaped, etc. If you are interested in this, please look into it.
Links
- Godot Docs: Matrices and transforms
- YouTube: How to Make a Bullet Hell Projectile Pattern Generator in Godot
- YouTube: How to Make a Bullet Hell Game in Godot [P1] - Basic Collisions
UPDATE
2022/05/25 Added keys control settings.